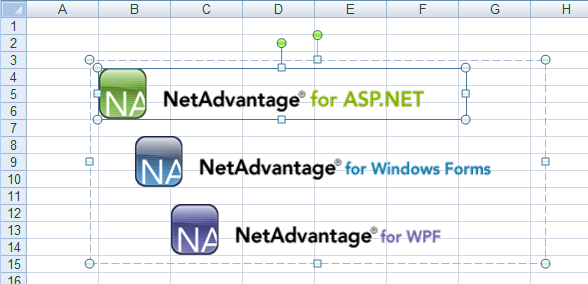
Infragistics.Documents.Excel アセンブリの優れた点の 1 つとして、画像および形状をワークシートに追加する機能があります。Microsoft® Excel® と同様に、画像をワークシート上の必要な位置に配置し、同じワークシート上の他の形状とグループ化することもできます。形状を使用は、形状を作成し、ワークシート上でのその形状の位置を決定するアンカーを設定し、それをワークシートに追加するという簡単なプロセスです。
形状をワークシートに直接配置するだけでなく、ワークシート上の形状をグループ化することもできます。形状をグループ化すると、グループ全体を 1 つの形状として移動できるので、グループ内の形状同士を常に同じ位置関係に保つことができます。
この詳細なガイドでは、画像をワークシートに追加し、ひとつの形状としてグループ化するために必要な手順を説明します。
ワークシートを使用してワークブックを作成します。
ひとつのワークシートを使用してワークブックを作成します。
Visual Basic の場合:
Dim workbook As New Infragistics.Documents.Excel.Workbook()
Dim worksheet As Infragistics.Documents.Excel.Worksheet = _
  workbook.Worksheets.Add("Sheet1")
C# の場合:
Infragistics.Documents.Excel.Workbook workbook = new Infragistics.Documents.Excel.Workbook();
Infragistics.Documents.Excel.Worksheet worksheet = workbook.Worksheets.Add( "Sheet1" );
画像の形状を作成してワークシートに配置します。
画像を作成します。
Visual Basic の場合:
Dim aspImage As Image = Image.FromFile("C:NA_AspNet.gif")
Dim winImage As Image = Image.FromFile("C:NA_Win_Forms.gif")
Dim wpfImage As Image = Image.FromFile("C:NA_WPF.gif")
C# の場合:
Image aspImage = Image.FromFile( "C:NA_AspNet.gif" );
Image winImage = Image.FromFile( "C:NA_Win_Forms.gif" );
Image wpfImage = Image.FromFile( "C:NA_WPF.gif" );
画像の形状を作成してワークシートに配置します。
Visual Basic の場合:
Dim aspImageShape As Infragistics.Documents.Excel.WorksheetImage = _
  New Infragistics.Documents.Excel.WorksheetImage(aspImage)
Dim winImageShape As Infragistics.Documents.Excel.WorksheetImage = _
  New Infragistics.Documents.Excel.WorksheetImage(winImage)
Dim wpfImageShape As Infragistics.Documents.Excel.WorksheetImage = _
  New Infragistics.Documents.Excel.WorksheetImage(wpfImage)
C# の場合:
Infragistics.Documents.Excel.WorksheetImage aspImageShape =
  new Infragistics.Documents.Excel.WorksheetImage( aspImage );
Infragistics.Documents.Excel.WorksheetImage winImageShape =
  new Infragistics.Documents.Excel.WorksheetImage( winImage );
Infragistics.Documents.Excel.WorksheetImage wpfImageShape =
  new Infragistics.Documents.Excel.WorksheetImage( wpfImage );
画像の形状で位置アンカーを設定します。
形状をグループまたはワークシートに追加する前に、アンカーを設定する必要があります。ワークシート上のセルに応じて形状を配置します。
Visual Basic の場合:
aspImageShape.TopLeftCornerCell = worksheet.Rows.Item(3).Cells.Item(1)
aspImageShape.BottomRightCornerCell = worksheet.Rows.Item(5).Cells.Item(6)
' The bottom-right corner of the shape should be close to the
' bottom-left corner of its anchor cell
aspImageShape.BottomRightCornerPosition = New PointF(10, 100)

winImageShape.TopLeftCornerCell = worksheet.Rows.Item(7).Cells.Item(1)
' The top-left corner of the shape should be in the top-middle
' of its anchor cell
winImageShape.TopLeftCornerPosition = New PointF(50, 0)
winImageShape.BottomRightCornerCell = worksheet.Rows.Item(9).Cells.Item(6)
' The bottom-right corner of the shape should be close to the
' bottom-middle of its anchor cell
winImageShape.BottomRightCornerPosition = New PointF(60, 100)

wpfImageShape.TopLeftCornerCell = worksheet.Rows.Item(11).Cells.Item(2)
wpfImageShape.BottomRightCornerCell = worksheet.Rows.Item(13).Cells.Item(7)
' The bottom-right corner of the shape should be close to the
' bottom-left corner of its anchor cell
wpfImageShape.BottomRightCornerPosition = New PointF(10, 100)
C# の場合:
aspImageShape.TopLeftCornerCell = worksheet.Rows[3].Cells[1];
aspImageShape.BottomRightCornerCell = worksheet.Rows[5].Cells[6];
// The bottom-right corner of the shape should be close to the
// bottom-left corner of its anchor cell
aspImageShape.BottomRightCornerPosition = new PointF( 10, 100 );

winImageShape.TopLeftCornerCell = worksheet.Rows[7].Cells[1];
// The top-right corner of the shape should be in the top-middle
// of its anchor cell
winImageShape.TopLeftCornerPosition = new PointF( 50, 0 );
winImageShape.BottomRightCornerCell = worksheet.Rows[9].Cells[6];
// The bottom-right corner of the shape should be close to the
// bottom-middle of its anchor cell
winImageShape.BottomRightCornerPosition = new PointF( 60, 100 );

wpfImageShape.TopLeftCornerCell = worksheet.Rows[11].Cells[ 2 ];
wpfImageShape.BottomRightCornerCell = worksheet.Rows[13].Cells[7];
// The bottom-right corner of the shape should be close to the
// bottom-left corner of its anchor cell
wpfImageShape.BottomRightCornerPosition = new PointF( 10, 100 );
画像の形状をグループ化します。
形状のグループを作成します。これも形状となります。
Visual Basic の場合:
Dim group As Infragistics.Documents.Excel.WorksheetShapeGroup = _
  New Infragistics.Documents.Excel.WorksheetShapeGroup()
C# の場合:
Infragistics.Documents.Excel.WorksheetShapeGroup group =
  new Infragistics.Documents.Excel.WorksheetShapeGroup();
形状をグループに追加します。形状を形状グループに追加または削除するとき、独自のアンカーを自動的に設定します。それは、すべての形状を完全に収容できる最初の四角形です。このため、形状グループのアンカーを設定する必要はありません。
Visual Basic の場合:
group.Shapes.Add(aspImageShape)
group.Shapes.Add(winImageShape)
group.Shapes.Add(wpfImageShape)
C# の場合:
group.Shapes.Add( aspImageShape );
group.Shapes.Add( winImageShape );
group.Shapes.Add( wpfImageShape );
グループ(画像の形状を含んでいる)をワークシートに追加します。
Visual Basic の場合:
worksheet.Shapes.Add(group)
C# の場合:
worksheet.Shapes.Add( group );
ワークブックをシリアル化します。
ワークブックをファイルに書き出します。
Visual Basic の場合:
workbook.Serialize("C:Shapes.xls")
C# の場合:
workbook.Serialize( "C:Shapes.xls" );

オンラインで表示: GitHub