
スタイルをセルに適用する機能は、Infragistics.Documents.Excel アセンブリでワークシートをカスタマイズする方法の 1 つです。セルのあらゆる特性はカスタマイズ可能で、各セルに異なる表示方法を設定できます。セルで使用するフォント、セルの背景と境界線、およびテキストの配置と回転を制御できます。同じセル内の異なるテキスト部分に異なる書式設定を使用することもできます。
ほとんどのスタイルは、WorksheetCell、WorksheetRow、WorksheetColumn、および WorksheetMergedCellsRegion の CellFormat プロパティでプロパティを設定することで適用できます。
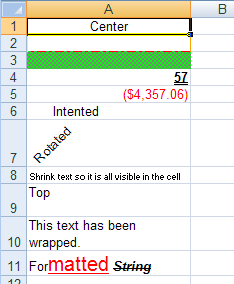
この詳細なガイドでは、ワークシートのセルにさまざまなスタイルを適用する方法を示します。
ワークシートを使用してワークブックを作成します。
ひとつのワークシートを使用してワークブックを作成します。
Visual Basic の場合:
Dim workbook As New Infragistics.Documents.Excel.Workbook()
Dim worksheet As Infragistics.Documents.Excel.Worksheet = _
  workbook.Worksheets.Add("Sheet1")
C# の場合:
Infragistics.Documents.Excel.Workbook workbook = new Infragistics.Documents.Excel.Workbook();
Infragistics.Documents.Excel.Worksheet worksheet = workbook.Worksheets.Add( "Sheet1" );
セルのすべてのテキストが表示されるように、最初の列の幅を広げます。
Visual Basic の場合:
worksheet.Columns.Item(0).Width = 6000
C# の場合:
worksheet.Columns[0].Width = 6000;
スタイルをセルに適用します。
値がセルで中央揃えになるようにセルの水平方向の配置を変更します。
Visual Basic の場合:
worksheet.Rows.Item(0).Cells.Item(0).Value = "Center"
worksheet.Rows.Item(0).Cells.Item(0).CellFormat.Alignment = _
  Infragistics.Documents.Excel.HorizontalCellAlignment.Center
C# の場合:
worksheet.Rows[0].Cells[0].Value = "Center";
worksheet.Rows[0].Cells[0].CellFormat.Alignment =
  Infragistics.Documents.Excel.HorizontalCellAlignment.Center;
セルに異なる境界線スタイルと色を指定して、他のセルと区別します。
Visual Basic の場合:
worksheet.Rows.Item(1).Cells.Item(0).CellFormat.BottomBorderColor = Color.Red
worksheet.Rows.Item(1).Cells.Item(0).CellFormat.BottomBorderStyle = _
  Infragistics.Documents.Excel.CellBorderLineStyle.DashDot
worksheet.Rows.Item(1).Cells.Item(0).CellFormat.LeftBorderColor = Color.Yellow
worksheet.Rows.Item(1).Cells.Item(0).CellFormat.LeftBorderStyle = _
  Infragistics.Documents.Excel.CellBorderLineStyle.Thick
worksheet.Rows.Item(1).Cells.Item(0).CellFormat.RightBorderColor = Color.Orange
worksheet.Rows.Item(1).Cells.Item(0).CellFormat.RightBorderStyle = _
  Infragistics.Documents.Excel.CellBorderLineStyle.Thin
worksheet.Rows.Item(1).Cells.Item(0).CellFormat.TopBorderColor = Color.Blue
worksheet.Rows.Item(1).Cells.Item(0).CellFormat.TopBorderStyle = _
  Infragistics.Documents.Excel.CellBorderLineStyle.Double
C# の場合:
worksheet.Rows[1].Cells[0].CellFormat.BottomBorderColor = Color.Red;
worksheet.Rows[1].Cells[0].CellFormat.BottomBorderStyle =
  Infragistics.Documents.Excel.CellBorderLineStyle.DashDot;
worksheet.Rows[1].Cells[0].CellFormat.LeftBorderColor = Color.Yellow;
worksheet.Rows[1].Cells[0].CellFormat.LeftBorderStyle =
  Infragistics.Documents.Excel.CellBorderLineStyle.Thick;
worksheet.Rows[1].Cells[0].CellFormat.RightBorderColor = Color.Orange;
worksheet.Rows[1].Cells[0].CellFormat.RightBorderStyle =
  Infragistics.Documents.Excel.CellBorderLineStyle.Thin;
worksheet.Rows[1].Cells[0].CellFormat.TopBorderColor = Color.Blue;
worksheet.Rows[1].Cells[0].CellFormat.TopBorderStyle =
  Infragistics.Documents.Excel.CellBorderLineStyle.Double;
背景のスタイルをセルに適用して、目立たせます。
Visual Basic の場合:
worksheet.Rows.Item(2).Cells.Item(0).CellFormat.FillPattern = _
  Infragistics.Documents.Excel.FillPatternStyle.DiagonalCrosshatch
worksheet.Rows.Item(2).Cells.Item(0).CellFormat.FillPatternBackgroundColor = _
  Color.Lime
worksheet.Rows.Item(2).Cells.Item(0).CellFormat.FillPatternForegroundColor = _
  Color.Gray
C# の場合:
worksheet.Rows[2].Cells[0].CellFormat.FillPattern =
  Infragistics.Documents.Excel.FillPatternStyle.DiagonalCrosshatch;
worksheet.Rows[2].Cells[0].CellFormat.FillPatternBackgroundColor =
  Color.Lime;
worksheet.Rows[2].Cells[0].CellFormat.FillPatternForegroundColor =
  Color.Gray;
値が異なって表示されるように、セルのフォントを変更します。
Visual Basic の場合:
worksheet.Rows.Item(3).Cells.Item(0).Value = 57
worksheet.Rows.Item(3).Cells.Item(0).CellFormat.Font.Bold = _
  Infragistics.Documents.Excel.ExcelDefaultableBoolean.True
worksheet.Rows.Item(3).Cells.Item(0).CellFormat.Font.UnderlineStyle = _
  Infragistics.Documents.Excel.FontUnderlineStyle.Double
C# の場合:
worksheet.Rows[3].Cells[0].Value = 57;
worksheet.Rows[3].Cells[0].CellFormat.Font.Bold =
  Infragistics.Documents.Excel.ExcelDefaultableBoolean.True;
worksheet.Rows[3].Cells[0].CellFormat.Font.UnderlineStyle =
  Infragistics.Documents.Excel.FontUnderlineStyle.Double;
表示される値のタイプを認識しやすくするために、フォーマット文字列をセルに適用します(以下のセルは通貨を表示するために使用されます)。
Visual Basic の場合:
worksheet.Rows.Item(4).Cells.Item(0).Value = -4357.059
worksheet.Rows.Item(4).Cells.Item(0).CellFormat.FormatString = _
  """$""#,##0.00_);[Red](""$""#,##0.00)"
C# の場合:
worksheet.Rows[4].Cells[0].Value = -4357.059;
worksheet.Rows[4].Cells[0].CellFormat.FormatString =
  ""$"#,##0.00_);[Red]("$"#,##0.00)";
セルでテキストをインデントします。
Visual Basic の場合:
worksheet.Rows.Item(5).Cells.Item(0).Value = "Intented"
worksheet.Rows.Item(5).Cells.Item(0).CellFormat.Indent = 2
C# の場合:
worksheet.Rows[5].Cells[0].Value = "Intented";
worksheet.Rows[5].Cells[0].CellFormat.Indent = 2;
セルでテキストを回転します。
Visual Basic の場合:
worksheet.Rows.Item(6).Cells.Item(0).Value = "Rotated"
worksheet.Rows.Item(6).Cells.Item(0).CellFormat.Rotation = 45
C# の場合:
worksheet.Rows[6].Cells[0].Value = "Rotated";
worksheet.Rows[6].Cells[0].CellFormat.Rotation = 45;
セルに収まるようにテキストを縮小します。
Visual Basic の場合:
worksheet.Rows.Item(7).Cells.Item(0).Value = _
  "Shrink text so it is all visible in the cell"
worksheet.Rows.Item(7).Cells.Item(0).CellFormat.ShrinkToFit = _
  Infragistics.Documents.Excel.ExcelDefaultableBoolean.True
C# の場合:
worksheet.Rows[7].Cells[0].Value =
  "Shrink text so it is all visible in the cell";
worksheet.Rows[7].Cells[0].CellFormat.ShrinkToFit =
  Infragistics.Documents.Excel.ExcelDefaultableBoolean.True;
セルにデフォルトの高さがない場合に値がセルの上部に表示されるように、セルの垂直方向の配置を変更します。
Visual Basic の場合:
worksheet.Rows.Item(8).Height = 500
worksheet.Rows.Item(8).Cells.Item(0).Value = "Top"
worksheet.Rows.Item(8).Cells.Item(0).CellFormat.VerticalAlignment = _
  Infragistics.Documents.Excel.VerticalCellAlignment.Top
C# の場合:
worksheet.Rows[8].Height = 500;
worksheet.Rows[8].Cells[0].Value = "Top";
worksheet.Rows[8].Cells[0].CellFormat.VerticalAlignment =
  Infragistics.Documents.Excel.VerticalCellAlignment.Top;
セル内のテキストが次のセルにはみ出したり、途中で切れないように、折り返します。
Visual Basic の場合:
worksheet.Rows.Item(9).Cells.Item(0).Value = _
  "This text has been wrapped."
worksheet.Rows.Item(9).Cells.Item(0).CellFormat.WrapText = _
  Infragistics.Documents.Excel.ExcelDefaultableBoolean.True
C# の場合:
worksheet.Rows[9].Cells[0].Value =
  "This text has been wrapped.";
worksheet.Rows[9].Cells[0].CellFormat.WrapText =
  Infragistics.Documents.Excel.ExcelDefaultableBoolean.True;
FormattedString オブジェクトを使用して、セル内のテキストに混ざったフォーマットを適用します。
Visual Basic の場合:
Dim formattedString As Infragistics.Documents.Excel.FormattedString = _
  New Infragistics.Documents.Excel.FormattedString("Formatted String")
worksheet.Rows.Item(10).Cells.Item(0).Value = formattedString

Dim font1 As Infragistics.Documents.Excel.FormattedStringFont = _
  formattedString.GetFont(3, 6)
font1.Color = Color.Red
font1.UnderlineStyle = Infragistics.Documents.Excel.FontUnderlineStyle.Single
font1.Height = 300

Dim font2 As Infragistics.Documents.Excel.FormattedStringFont = _
  formattedString.GetFont(10)
font2.Bold = Infragistics.Documents.Excel.ExcelDefaultableBoolean.True
font2.Italic = Infragistics.Documents.Excel.ExcelDefaultableBoolean.True
font2.Strikeout = Infragistics.Documents.Excel.ExcelDefaultableBoolean.True
C# の場合:
Infragistics.Documents.Excel.FormattedString formattedString =
  new Infragistics.Documents.Excel.FormattedString( "Formatted String" );
worksheet.Rows[10].Cells[0].Value = formattedString;

Infragistics.Documents.Excel.FormattedStringFont font1 = formattedString.GetFont( 3, 6 );
font1.Color = Color.Red;
font1.UnderlineStyle = Infragistics.Documents.Excel.FontUnderlineStyle.Single;
font1.Height = 300;

Infragistics.Documents.Excel.FormattedStringFont font2 = formattedString.GetFont( 10 );
font2.Bold = Infragistics.Documents.Excel.ExcelDefaultableBoolean.True;
font2.Italic = Infragistics.Documents.Excel.ExcelDefaultableBoolean.True;
font2.Strikeout = Infragistics.Documents.Excel.ExcelDefaultableBoolean.True;
ワークブックをシリアル化します。
ワークブックをファイルに書き出します。
Visual Basic の場合:
workbook.Serialize("C:Styles.xls")
C# の場合:
workbook.Serialize( "C:Styles.xls" );
オンラインで表示: GitHub